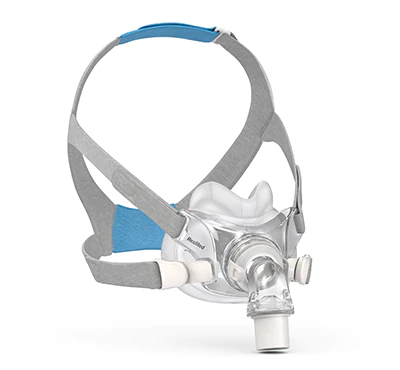
AirFit F30

  • Minimal contact, under-the-nose design means no red marks on nasal bridge
  • QuietAirTM diffused venting designed to allow patients to sleep closer to their bed partner
  • Easy-to-use magnetic headgear clips helps facilitate quick fitting
  • Unobstructed field of vision makes it easy to read or watch TV
  • Only two cushion sizes and a one-size fits all headgear simplifies fitting and stock management

The mask contains magnets that may interfere with certain implants or medical devices. Please refer to the Support documents for complete labeling information, including magnet contraindications and warnings. 
AirFitF30_HeroImage

Minimal-contact redefined

Featuring an under-the-nose, ultra-compact cushion design, AirFit F30 helps prevent discomfort and facial markings on the nasal bridge.

More peaceful sleep

The AirFit F30 features the same performant QuietAirTM vent as the AirFit F20 mask, gently diffusing exhaled air to minimise noise, helping to facilitate a more peaceful sleep for your patient and their bed partner.

Streamlined operations

You can achieve fast and effcicient fitting with just one frame, one headgear and two cushion sizes. This streamlined setup simplifies stock management and logistics.

Support

Supporting you
Supporting your patients
Swipe

Choosing the right mask cushion

  1. Use the AirFit F30 full face mask fitting template included in the AirFit F30 mask package and your best judgement to determine the right cushion size for patients.
  2. Hold the sizing template horizontally under the nose. Assess whether their nose falls inside or exceeds the width or length margins on the template to determine their cushion size. 
  3. Select the matching ultra-compact cushion size (small or medium) based on where the outer edge of the patient's nostrils contacts the cut out section outline on the sizing template. Cushion size is based on the patient's nose width. 
  4. If the width of the nose breaches the template margins, size up (to medium).

Fine-tuned fitting

  1. Twist and pull both magnetic clips away from the mask frame.
  2. Place the ultra-compact cushion under the patient's nose and ensure it sits comfortably against the face. With the ResMed logo on the headgear facing up, pull the headgear over the patient's head. 
  3. Bring the lower headgear straps behind the patient's ears and attach the magnetic headgear clips to the mask frame.
  4. Undo the fastening tabs on the upper headgear strap and pull evenly. Repeat with the lower headgear straps.
  5. If the headgear is too close to the patient's ears, adjust the top headgear strap. 
  6. Connect the device air tubing to the elbow and attach the elbow to the mask, ensuring that it clicks in place.

Fitting patients with long hair

  1. For patients with longer hair, we recommend feeding their hair through the back of the headgear. 
  2. If tied in a ponytail, it should sit high enough to fit comfortably through the back of the headgear. 

Disconnecting and reconnecting

  1. AirFit F30 was designed to be fast and easy fo rpatients to slip on and off during the night. First, make sure the CPAP machine is turned off by pressing the ON/OFF button on the top. 
  2. Then, locate the quick-release buttons on either side of the QuietAir elbow. Squeeze them both and pull up to detach from the mask frame in a single click.
  3. To restart therapy, the patient simply recommends the QuietAir elbow to the mask frame.
  4. Squeeze the quick-release buttons on either side of the QuietAir elbow and pull down to reattach to the frame in a single click.
  5. Twist the mask elbow to make sure it's rotatable, but secured in place. 
  6. Press the ON/OFF button on the top of the CPAP machine to resume therapy.

Initial mask inspection

  1. Remove all packaging. 
  2. Perform a visual inspection of each mask component.
  3. If any visible deterioration of a mask component is apparent (e.g. cracking, crazing, tears etc.), the mask component should be discarded and replaced. 
  4. A slight discoloration of the silicone components may occur and is acceptable.

Managing mask leak

  1. Locate where the air is escaping from, which is typically above or below the ultra-compact cushion. Note, there is an intentional vent on the front of the cushion where air will flow through. This is normal. If air is escaping, this is typically above or below the cushion.
  2. Adjust the cushion by gently pulling it away from the patient's face and letting it reseal itself. 
  3. Adjust the top, upper and/or lower headgear straps as needed to achieve a more secure seal. To avoid overtightening the headgear straps, adjust them only enough for a comfortable seal.
  4. Check to ensure the mask frame is secure and that the QuietAir elbow and air tubing are not pulling on the mask.
  5. If leak continues, consider fitting the patient with a different size mask.

Daily mask cleaning

  1. The QuietAir elbow, mask frame and ultra-compact cushion should be cleaned after each use. 
  2. Follow the mask disassembly instructions.
  3. Soak the mask components in warm water and a mild liquid detergent. Ensure there are no air bubbles while soaking. 
  4. Shake the mask components vigorously in the water for at least one minute and hand wash with a soft bristle brush. Pay particular attention to cleaning the rotatable elbow, vent holes, frame where the arms connect, and inside and outside the frame where the elbow connects.
  5. Rinse the mask components thorougly under running tap water. 
  6. Leave the mask components to air dry away from direct sunlight. 
  7. Repeat the daily cleaning steps if the mask components are not visibly clean. 

Weekly mask cleaning

  1. The one-size-fits-all headgear should be cleaned weekly. Follow the mask disassembly instructions. Magnetic clips can remain attached to the headgear during cleaning. 
  2. Hand wash the headgear in warm water with a mild liquid detergent. Ensure there are no air bubbles while soaking. 
  3. Rinse the headgear thoroughly under running tap water.
  4. Squeeze the headgear with a clean towel to remove excess water.
  5. Leave each of the components to air dry away from direct sunlight.
  6. If the headgear is not visibly clean, repeat the weekly cleaning steps.

Assembling the mask

  1. Ensure you have all the mask components and parts together.
  2. With the ResMed logo facing outwards and up, insert the upper headgear straps into the frame from the inside and fold the fastening tab over to secure. 
  3. Hold the top and bottom of the ultra-compact cushion and connect it to the mask frame.
  4. Squeeze the quick-release buttons on either side of the QuietAir eblow and pull down to reattach to the frame. 
  5. Twist the mask elbow to make sure it's rotatable, but secured in place.

Disassembling the mask

  1. Disconnect the air tubing from the QuietAir elbow so the CPAP machine is no longer connected to the mask. 
  2. Undo the upper headgear fastening tab and pull strapping away from the frame. Keep the magnetic clips attached to the lower headgear straps. 
  3. Squeeze the quick-release buttons on either side of the QuietAir elbow and pull up to detach from the frame. 
  4. Hold the top and bottom of the ultra-compact cushion and pull it away from the frame.

Ongoing mask inspection

  1. To maintain optimum therapy performance, your patient should check their mask regularly for signs of damage and deterioration (e.g. cracking, crazing, tears etc.).
  2. The patient should check each mask component as its cleaned, including the one-size-fits-all headgear, mask frame, QuietAir elbow, ultra-compact cushion and air tubing. 
  3. If any mask component appears to be damaged, it may need to be replaced. 
  4. Patients should replace mask components regularly to help prevent mask deterioration from occurring and help optimise mask performance.
travellingwithyourequipment

Access extra service and support by registering your ResMed product.

Learn more
resmedmyair_b2c

For further support, our free myAir program offers ongoing care and guidance via personalised therapy tips, coaching and advice.

Learn more
registeryourproduct

If you have any questions regarding warranty information on our masks, please contact our local customer service team.

Learn more

An ecosystem of solutions for individual answers

From diagnostics and healthcare informatics to therapy devices and masks, our solution can help you get a better night's rest. Crafted to offer both confidence and flexibility, our products allow for a high-quality therapy experience catered to your needs.

Our device, mask and accessory ranges, together with our online support program myAir™, enable you to easily customise your therapy experience to your preferences.