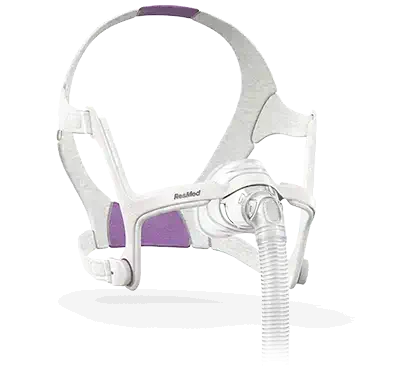
A ResMed 2016 international study found that our nasal InfinitySeal silicone cushion fit 99.4% of all patients tested1. These extensive testings are done so you can be confident that your patients will have a mask that fits and performs.
With its innovative design, AirFit N20 has been finished and shaped to adapt to the unique facial contours of each of your patients, offering a robust seal regardless of face shape or size.
Discover the new cushion’s geometry here .
71% of patients said they preferred wearing AirFit N20 over their current nasal mask in a ResMed 2016 study2.
With new cushion technology and a plush frame, 75% of patients tested found AirFit N20 brought more stability than their current nasal mask2, demonstrating that our technologies work to deliver a superior experience of patient comfort.
Designed for women, this range was specifically crafted to give every woman a more personalised mask that better meets her unique facial features and adapts to the way she sleeps.
Designed to comfortably fit a broader range of patients, AirFit N20 features an entirely new cushion design. To make fitting your existing patients easier, we recommend using our sizing guide – included in each AirFit N20 box and specifically designed to help patients find the right fit. You can also download a copy of it from the ResMed website.
The sizing guide has three cut-outs: small, medium and large. Find the size that accommodates your patient. The modular design of AirFit N20 means each size cushion easily clicks into the same mask frame for easier setup.
Unclip EasyClick Magnets.
With your patient holding the mask towards their face, slide the headgear over the back of their head.
Reclip EasyClick Magnets.
Adjust the tabs on the upper headgear straps.
Adjust the tabs on the lower headgear straps. The upper headgear straps provide most of the adjustment. The lower headgear straps can be used to gently tighten a patient’s mask. Do not overtighten as this may cause discomfort. If your patient experiences leaks, or for additional information on mask maintenance and care, you can also visit the Supporting your patients section for more videos.
Unclip the EasyClick Magnets.
With the mask held against your face, pull the headgear over your head.
Bring each of the magnets up to meet their corresponding clips on the frame.
Adjust the tabs on the upper headgear.
Adjust the tabs on the lower headgear.
With your device still switched off, connect your device tubing to your mask elbow.
Connect the elbow to your mask.
Switch on your therapy device.
Leak often occurs when your mask’s seal is compromised by movement, incorrect fitting or improper sizing.
To find a source of leak, run your finger along the edge of your mask’s seal. Once located, adjust your headgear.
Resolve any leak in the upper part of your mask by adjusting your upper straps.
Resolve lower mask leak with your lower straps.
If leak persists, reseal by briefly pulling your mask away from your face and letting your cushion reinflate.
If leak continues, you may need a different size mask. Try our sizing guide or speak to your healthcare provider about getting a different size mask.
Disassemble mask.
Soak cushion, elbow and short tubing in warm water (approximately 86°F/30°C) with mild liquid detergent for up to ten minutes. To ensure a thorough clean, shake components in water.
Clean components with a soft-bristle brush.
Rinse components under warm water. Inspect each component to ensure that each is clean and free of detergent residue. Wash and rinse again, if necessary.
Leave mask components to air dry out of direct sunlight.
Disassemble mask. EasyClick Magnets can remain attached to headgear during cleaning.
Soak frame and headgear in warm water (approximately 86°F/30°C) with mild liquid detergent for up to ten minutes. To ensure a thorough clean, shake frame and headgear in water.
Rinse both components in clean water. Squeeze each repeatedly to ensure detergent is fully removed. Inspect each component to ensure that each is clean and free of detergent residue. Wash and rinse again, if necessary.
Squeeze each component repeatedly to remove excess water.
Leave both components to air dry out of direct sunlight.
Remove elbow from frame.
Unclip the EasyClick Magnets.
Pull strapping away from frame.
Hold the frame by placing your thumb over the side slot. Pull cushion away from frame.
Push the cushion into the frame. The frame has a shape that allows you to insert the cushion only one way.
With the ResMed logo on the headgear facing outside and upright, attach the EasyClick Magnets.
Thread the upper headgear straps into the frame slots from the inside. Fold them over to secure.
Connect elbow to mask frame.
For additional therapy assistance.
Documents
If you have any questions regarding warranty information on our masks, please contact your local customer service team.
AirView is ResMed’s cloud-based patient management system that provides remote access to your patients’ therapy data. Patients using AirSense™ 10 or AirCurve™ 10 devices with built-in wireless connectivity can be remotely monitored. * Wireless communication depends on network availability.
To offer your patients extra support, you can introduce them to myAir, ResMed’s online patient support program for users of AirSense™ 10 and AirCurve™ 10 devices with built-in wireless connectivity.
*Wireless communication depends on network availability.
Here are some links to help your patients get on the right track with the sleep therapy..
ResMed AirFit N20 internal global fitting study of 159 existing ResMed patients, conducted 12/11/2015; ID A3768073.
ResMed internal study of 24 existing ResMed patients, conducted between 23/11/2015 - 21/12/2015 comparing the market leading mask with AirFit N20; ID A3768073.